
🚀 Introducing News - share important updates with your customers, all within Gist Messenger!
We’re excited to introduce a new product that lets you share feature updates, promotions, and events directly within Messenger. This makes it easy for customers to find and revisit important announcements.
Key Features:
Share product launches, feature updates, promotions, and events in a streamlined feed within Messenger.
Use labels (such as Product Updates, Events, and Promotions) so customers can browse announcements by topic.
Showcase your announcements on a customizable webpage, complete with your branding.
Set up a custom domain for a seamless experience.
Let customers express their opinions and feedback with a simple click.
With News in Messenger, keeping your customers informed has never been simpler. All your important announcements are just a click away - ensuring no one misses out on crucial updates!
Learn more in our help article.
Give it a try today, and share your thoughts with us! 🎉
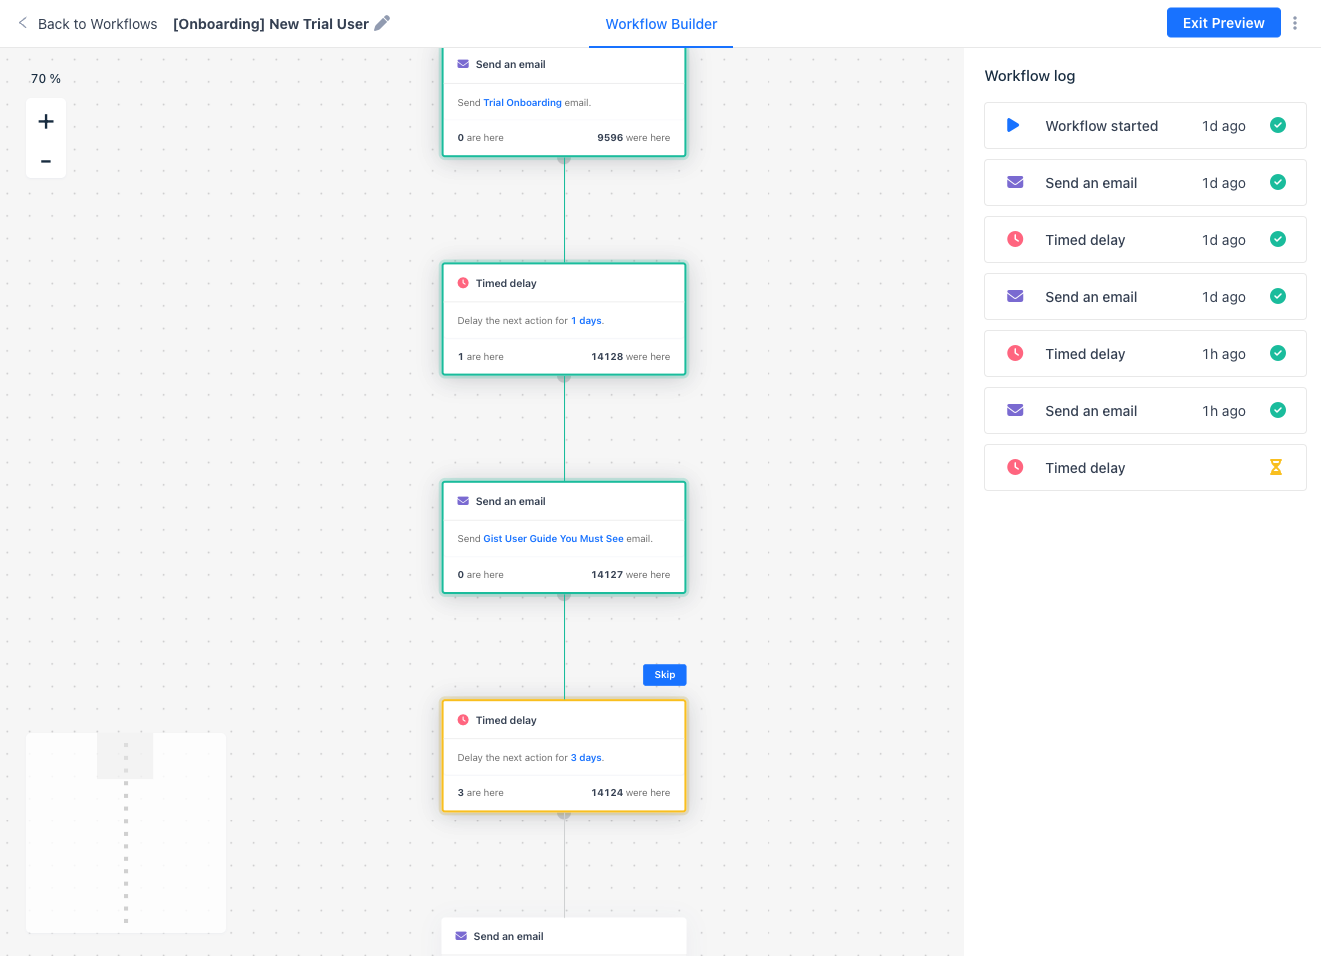
See exactly where your contacts are in workflows
We’re excited to announce a new update that gives you more visibility into your contacts' automation journeys! You can now see exactly where a contact is within your workflow and how they entered it. This makes it easier to understand their path, giving you insights into the steps they've completed. It’s a great way to address any questions or issues with your automation.
Here’s how to view your contact's path in workflows:
1. Navigate to the Contacts list by clicking "Contacts" in the top menu.
2. Use the search box to quickly find the contact you're looking for.
3. Click the contact's name to open their profile.
4. Scroll down to the Workflows widget and expand it to see all active workflows. Click the workflow you want to check.
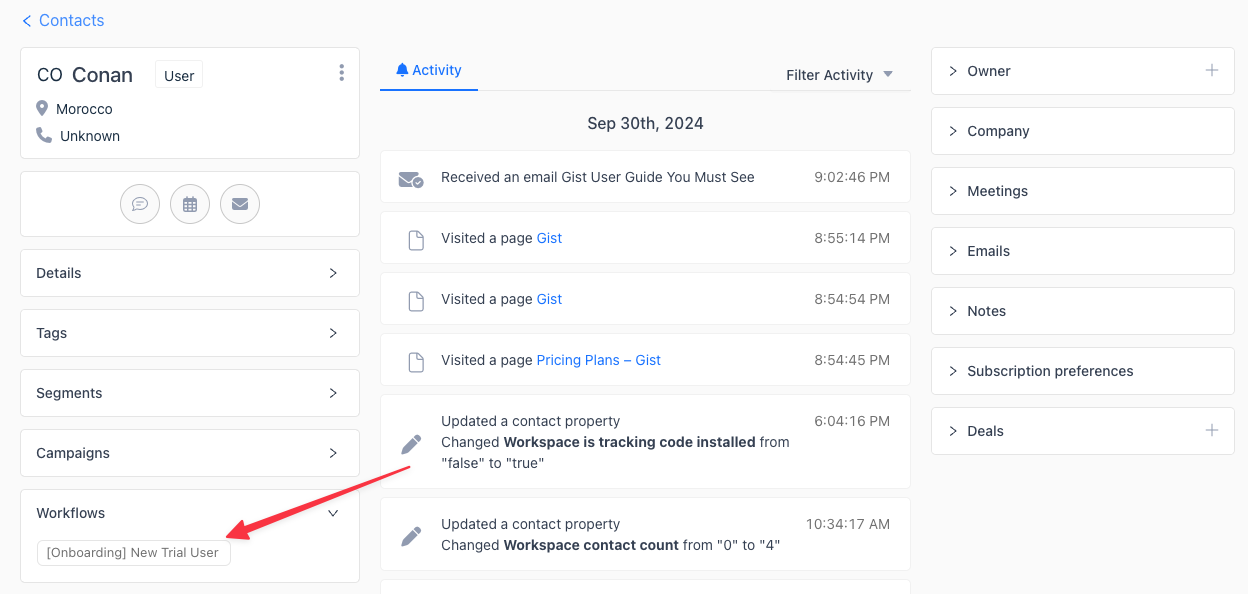
5. You’ll be taken to the workflow builder, where you can see each step the contact has completed and their current position in the workflow.
💡 Pro Tip: Use this feature to quickly resolve automation issues or gain deeper insights into how your workflows perform with individual contacts. 🎯
Check it out today and streamline your workflows! ✨
Target contacts in Workflows based on prior engagement 🚀
We’re excited to announce a major upgrade to our workflows, offering you more power and flexibility in targeting contacts based on how they interact with your outbound messages. This update includes 39 new triggers and 10+ new decision groups, giving you the tools to create more personalized and effective customer journeys than ever before.
✨ Engagement-Based Triggers
You can now build workflows based on a wide range of contact activities, such as:
- Viewed, started, or submitted a form 📝
- Opened an email ✉️
- Clicked a link in an email 🔗
- Completed a product tour 🛠️
- And much more...
With these new triggers, you can better target your audience, improve engagement, and guide contacts through personalized journeys. Whether you're re-engaging leads, nurturing customers, or driving conversions, these powerful new tools will elevate your workflow automation.
To explore the full list of triggers and decision groups, check out our help article.
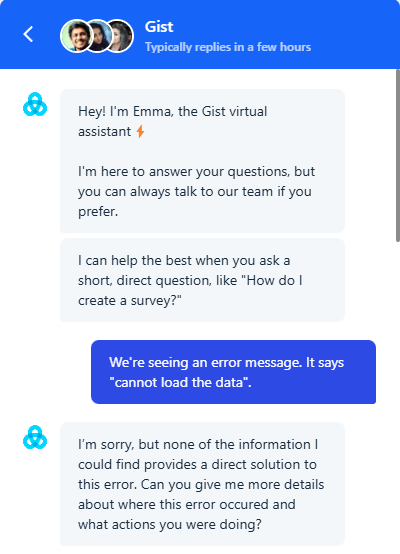
Emma AI just got smarter! ⭐️
We’re excited to announce that Emma, our AI-powered chatbot for customer support, is now smarter and more accurate than ever before!
Emma now asks sharper, clarifying questions when customers ask vague or ambiguous queries. Instead of making educated guesses or pulling up the most likely articles, Emma actively seeks clarification to gather the right information. This means more accurate responses, faster resolutions, and happier customers.
The impact has been huge! Some users are already seeing up to a 23 percentage point improvement in resolution rates since this update went live. And best of all - this upgrade is now available to all Emma users! 🎉
Style your Knowledge Base collections 🎨
We’re excited to introduce a new way to personalize your Knowledge Base! You can now upload custom icons to individual collections and set your own color scheme for each collection icon to make them more in tune with your brand’s identity. We currently support SVG or PNG.
In addition to these styling options, we’re launching a brand-new theme! Introducing the Modern Theme 🌐—a sleek, multilingual-ready theme with built-in support for multi-level collections. It’s designed to give your Knowledge Base a fresh, up-to-date look while still offering flexibility. As always, you can duplicate and customize it further to suit your needs.
With three themes to choose from - Classic, Minimal, and now Modern - your Knowledge Base has never been more customizable! 🎉
Give it a try and bring your collections to life! 🚀